Home » Why Your RV Skirt Fails When Temps Drop Below Freezing
Why Your RV Skirt Fails When Temps Drop Below Freezing
Why Your RV Skirt Fails When Temps Drop Below Freezing
Table of Contents
Your RV skirt is fully installed, properly secured, and the vinyl looks flawless—yet you’re still burning through propane like it’s going out of style. It’s the classic example of why your RV skirt fails when temps drop below freezing: the heater kicks on every 20 minutes, the floor stays ice-cold, and you’re wearing socks to bed in a heated rig.
THE VINYL SKIRT MYTH
Most RVers install vinyl skirting thinking they’ve solved winter insulation, then spend the season confused why their rigs still feel like freezers from the floor up.
WIND BARRIERS VS. THERMAL INSULATION
Single-layer vinyl RV skirts have an R-value of zero. That’s not an exaggeration or a flaw in cheaper models. It’s the actual thermal resistance of a material designed to block airflow, not transfer heat. Wind chill affects exposed pipes and open crawl spaces, and vinyl handles that job perfectly. But once you’ve eliminated moving air under the rig, the next heat thief is conductive loss through the floor itself, and that’s where vinyl becomes irrelevant.
Think of it this way: your RV floor is a giant heat sink sitting inches above frozen dirt or snow-covered pavement. Heat moves from the warm subfloor material down toward the colder ground through direct contact and radiation. A wind barrier stops convective loss but does nothing to interrupt conductive or radiant transfer.
Conductive loss: Heat moves from your warm subfloor directly into colder materials below it, including the metal frame, belly wrap, and eventually the frozen ground itself.
Radiant loss: Your warm floor radiates infrared heat downward, which gets absorbed by cold surfaces underneath the rig even when there’s no physical contact.
Convective loss: Wind pulls warm air out from under your rig and replaces it with cold air. This is the only mechanism vinyl skirting actually stops.
When ground temps hit 0°F, conductive and radiant losses dominate. You’re losing more heat through the floor than you’re losing through gaps in the skirting. That’s why your propane bill stays high and your floors stay cold even after you’ve sealed every seam and tucked every edge.
Single layer vinyl systems work great for three-season camping and mild winter conditions where ground temps stay above 20°F. Below that threshold, the lack of insulation value becomes the limiting factor in your rig’s ability to retain heat.
THE GROUND TEMPERATURE PROBLEM NOBODY MENTIONS
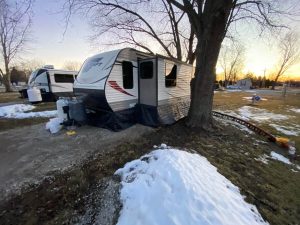
Your furnace heats the air inside your RV, but the floor temperature tells you what’s really happening with heat retention.
Ground temps in northern winter climates regularly drop to 0°F and below. That frozen mass sits directly beneath your RV, pulling heat downward through every material in the subfloor assembly. Vinyl skirting creates a dead air space underneath the rig, which helps when winds are high, but dead air alone has an R-value around R-1 per inch of thickness. In most skirted RV setups, you’re getting maybe 12 to 18 inches of air gap between ground and floor, which translates to roughly R-1 to R-1.5 total.
Here's what happens in real time
Hour 1: Furnace heats interior air to 68°F. Floor surface warms to 62°F.
Hour 2: Subfloor begins losing heat to the frozen ground below. Floor surface temp drops to 58°F.
Hour 4: Floor stabilizes at 52°F because heat loss matches heat input. You add more blankets.
The vinyl skirt stopped wind from making it worse, but it didn’t stop the thermal bleed. Your propane is fighting a battle it can’t win because the insulation value isn’t there.
When temps drop below 15°F, most RVers report floor temps in the 45°F to 55°F range even with skirting and a furnace running continuously. The colder the ground gets, the wider that gap becomes. At 0°F ground temp, you’re looking at a 60-degree difference between your interior air and the surface pulling heat away from below. No amount of vinyl tension or seam sealing will fix that.
This isn’t a workmanship issue. It’s a material selection issue. Vinyl does its job. The job just isn’t insulation.
Thickness looks impressive in product photos, but R-value determines actual thermal performance.
R-value measures a material’s resistance to heat flow. The higher the number, the slower heat escapes. Fiberglass batt insulation in your home’s walls typically runs R-13 to R-19. Spray foam hits R-6 to R-7 per inch. Vinyl skirting, regardless of thickness or brand, sits at R-0 because it’s a polymer film with no insulating core. Want to read more about R values? Check out this post.
What most RVers don’t realize: thicker vinyl doesn’t insulate better. It just resists tearing and holds its shape in wind. A 20-mil vinyl skirt and a 10-mil vinyl skirt have identical thermal performance, which is to say none. The material isn’t designed to trap air or slow conductive heat transfer. It’s designed to block drafts.
Single-layer vinyl: R-0, stops wind, no thermal resistance
Reflective bubble wrap: R-1 to R-1.5, helps slightly with radiant heat but compresses under weight
Foam board (1 inch): R-5 to R-6.5 depending on type, rigid and effective but hard to install around curved RV underbellies
When you’re shopping for cold-weather RV skirting, ignore the material thickness specs and look for R-value ratings. If the product page doesn’t list an R-value, assume it’s because the number is too low to market.
Temperature retention follows R-value. A well-installed R-7 quilted skirt will outperform a single-layer vinyl skirt by 30 to 40 degrees of floor temperature difference in freezing conditions. That’s the gap between tolerably cold floors and floors you can’t walk on barefoot.
If you want warm floors in sub-freezing temps, you need insulation with a real R-value, not just a wind barrier with good reviews.
Real-world temp difference: RVers who switch from a standard skirt to R-7 quilted skirting report floor surface temps jumping from the low 50s to the mid-60s with the same furnace settings and outside temps. That 10 to 15 degree gain cuts propane consumption by 20% to 30% and makes the rig livable without layering rugs and foam mats on every surface.
The Skirting Co.’s quilted insulation skirting uses six layers with trapped air pockets to create actual thermal resistance. The construction includes a premium vinyl outer layer, four layers of a durable, flexible foam, and a protecting back layer. This assembly delivers R-7, which is enough to keep floor temps in the low 60s even when ground temps hit zero.
Installation is similar to vinyl
Attachment: Use the same track, snaps, Pull It Up Fasteners, and velcro you’d use with the non-insulated, standard skirting. Quilted material is lightweight and flexible, so it maneuvers around slideouts, hitches, wheel wells, and more.
Sealing: Overlap seams by 6 inches and secure with heavy-duty velcro riveted onto the skirting panels. Quilted insulation should not be stretched tight.
Ground seal: Weight the bottom edge with sandbags, waterbags, water tubes, sand tubes, etc. You’re not trying to create an airtight seal; you’re preventing wind from lifting the skirt and letting cold air circulate underneath. We always suggest starting with 30 sand/water bags and increasing as needed.
Key performance difference: single-layer vinyl gives you draft protection; insulated, quilted skirting gives you draft protection plus heat retention. That’s the upgrade that changes how winter camping feels.
HEATED SOLUTIONS
Insulation slows heat loss. Supplemental heat replaces it. Combining both gives you the warmest floors and the lowest propane bills.
Heat tape for tanks and pipes: self-regulating heat tape draws 7 to 12 watts per foot and activates automatically when temps drop below 40°F. Run it along fresh water lines, gray and black tanks, and dump valves to prevent freeze damage. This doesn’t warm the entire underbelly, but it keeps critical systems functional and reduces the thermal load on your main furnace.
Heated water hose: A Heated Water Hose is a great option to guarantee a reliable water supply in harsh weather environments. Operating on 120VAC, this product boasts an 18AWG 6-foot power cord featuring an LED indicator for easy monitoring.
Programmable Space Heaters: We suggest monitoring the temps below the RV with a wireless thermometer. Additionally, using a programmable space heater under the RV can help take the chill off your pipes in extreme cold. The Yellow Jacket brand of space heaters can be controlled by the programmable thermostat so the heater doesn’t run constantly.
Combined strategy that works
Install R-7 insulated skirting to retain heat.
Add heat tape to water systems to prevent freezing or purchase a heated water hose to supply your RV with fresh water.
Run a space heater with a programmable thermostat to help take the chill off your pipes. This is much cheaper than replacing busted pipes or dealing with water damage.
This layered approach keeps floor temps in the mid-60s, eliminates frozen tanks, and cuts propane use by 30% to 40% compared to single-layer vinyl skirting plus constant furnace cycling.
Cost: heat tape runs $30 to $60 per 50-foot section. A Heated Water Hose is currently on sale for $120. Yellow Jacket space heaters can be purchased for around $125.
Power draw: if you’re boondocking, budget 100 to 200 watts for heated systems. If you’re on shore power, it’s negligible compared to what your electric blanket would pull.
WHAT NOT TO WASTE MONEY ON
Some popular “solutions” look good on paper but deliver minimal real-world improvement in freezing temps.
Reflective bubble wrap alone: R-1 to R-1.5 at best, compresses under weight, tears easily, doesn’t justify the cost compared to quilted insulation or foam board.
Hay bales stacked around the RV: creates rodent habitat, decomposes into mold, R-value drops when wet. Nostalgia isn’t insulation.
Pool noodles in the skirting gap: stops some airflow but adds no meaningful R-value. Costs more in time and frustration than just buying real insulation.
Double-layer vinyl: two layers of R-0 still equals R-0. You get better wind resistance but zero thermal improvement.
If it doesn’t have a published R-value above R-3, don’t expect it to solve floor temperature problems in sub-freezing weather. The gap between R-0 and R-7 is the difference between cold floors and comfortable floors. Everything in between is incremental at best.
The Verdict: Stop Fighting Physics and Upgrade Your R-Value
Winter RVing works when your insulation strategy matches the physics of heat loss, not when it matches what’s popular in Facebook groups. Vinyl skirting earned its reputation in mild climates and shoulder seasons. At 0°F, the job requires actual insulation, and the sooner you install it, the sooner your rig stops feeling like an icebox with wheels.
Now that you know why your RV skirt fails when temps drop below freezing, you can make the right fix. Quilted R-7 skirting costs about the same as premium vinyl but delivers floor temps 15 to 20 degrees warmer in freezing conditions. That’s the upgrade that makes winter livable—and it’s the one fix single-layer vinyl can’t replicate no matter how well you install it.
Hayley Hand
Hayley and her husband, Chase, lived full-time in their RV while Chase served in the military. They have traveled all over the United States with their 4 kids. Currently, the family is ranching in Montana and they enjoy exploring the great outdoors.
Did you enjoy this blog? Please share this article:


 Your furnace heats the air inside your RV, but the floor temperature tells you what’s really happening with heat retention.
 Real-world temp difference: RVers who switch from a standard skirt to R-7 quilted skirting report floor surface temps jumping from the low 50s to the mid-60s with the same furnace settings and outside temps. That 10 to 15 degree gain cuts propane consumption by 20% to 30% and makes the rig livable without layering rugs and foam mats on every surface.
 Attachment: Use the same track, snaps, Pull It Up Fasteners, and velcro you’d use with the non-insulated, standard skirting. Quilted material is lightweight and flexible, so it maneuvers around slideouts, hitches, wheel wells, and more.
 Insulation slows heat loss. Supplemental heat replaces it. Combining both gives you the warmest floors and the lowest propane bills.