Home » The Best DIY RV Skirting Guide With Professional Results
The Best DIY RV Skirting Guide With Professional Results
The Best DIY RV Skirting Guide With Professional Results
Table of Contents
Your RV is bleeding heat through the bottom right now, and you are paying for it with every propane refill. Welcome to The Best DIY RV Skirting Guide With Professional Results.
Why Cold Weather RV Living Needs Skirting
That open gap between your rig and the ground is working against you every single night you are parked in cold weather. It lets freezing air attack your underbelly, your pipes, and your floors from every direction. Winter RV living does not have to mean choosing between frozen pipes and a $300 monthly propane bill.
Skirting creates a thermal barrier between the ground and your RV underbelly. It blocks wind, traps warm air, and keeps your water lines from freezing. The difference between a skirted and unskirted RV in below freezing weather is not small. It is the difference between comfortable living and constantly troubleshooting frozen tanks.
This guide walks you through DIY RV skirting options that work in cold temperatures (and summer season, too!).
What Is RV Skirting and Why Does It Matter More Than You Think
Most people do not realize how much heat loss is being swallowed by the underbelly of their rig.
RV skirting is a barrier that runs along the perimeter of your unit between the bottom of the RV and the ground. Its job is to seal off that open cavity underneath from cold air, wind, and moisture. Think of it like insulating a crawl space under a house. Without it, your furnace fights the elements at full blast all night long. With it, the space under your RV becomes a buffer zone that holds warmth and keeps the cold at bay.
Pipe protection: Exposed water lines freeze fast in sub-freezing temperatures. Skirting keeps them in a warmer microclimate.
Floor comfort: Cold floors inside your RV are almost always a sign that cold air is getting under you without resistance.
Energy savings: A properly skirted RV can significantly cut down how often your furnace cycles, which directly reduces propane consumption.
Component longevity: Your underbelly holds tanks, lines, and wiring. Keeping them out of extreme cold extends their lifespan.
Skirting is not a luxury upgrade. For anyone camping in cold weather, whether for a weekend or a full season, it is one of the most practical things you can do for your rig. The sooner you install it, the sooner your whole setup works the way it was supposed to.
CHOOSING YOUR SKIRTING APPROACH
Picking the right skirting method depends on how long you plan to stay parked, what your budget looks like, and how hard the winter hits where you are stationed. Some methods take an hour to set up and work fine for mild winters. Others require a weekend of work but handle sustained freezing temperatures and high winds without failing.
Different RV Skirting Options
The number one mistake DIYers make with RV skirting is picking a material based on price alone and then discovering mid-project that it does not work the way they needed it to.
Material selection determines everything downstream. It affects how you measure, how you cut, how you attach, and how well the finished product holds up when temps drop hard. It’s a good idea to think through your situation before you commit to anything.
Do not skip this step. The right material on the wrong site is still the wrong material.
1. Foam Board Skirting
Rigid foam insulation board is a popular choice for stationary setups because it provides excellent insulation value and is easy to cut with basic tools. Foam board is widely available and affordable, making it a strong starting point for most DIYers. A wood frame is generally needed to help secure the foam board. The wood frame and foam boards are not easily transportable and often times are only used for one season.
For setups that move frequently, an R-7 Insulated DIY Skirting Kit from The Skirting Co. gives you the combination of insulation performance and installation flexibility that foam board simply cannot match when you are breaking camp every few days/weeks/months.
While this is a budget-friendly option, styrofoam board is frequently not allowed at many RV parks.
2. Snap-On Skirting
There are several options when it comes to snap on skirting. Different materials range from upcycled thin mil billboard tarp vinyl, new vinyl tarps, or a canvas skirt. Some people choose this system and utilize adhesive hooks or adhesive snaps. This allows the unit to be skirted with an RV windskirt that requires no drilling into the unit itself.
While the idea is great, the functionality tends to fail during winter weather. Cheap single-layer vinyl kits fail in the first heavy wind. The adhesive typically does not hold in a cold climate and soon the snaps need to be screwed into the RV. This results in screw holes every six inches, or so.
3. Straw Bale Perimeter Insulation
Mice can be a big issue when using straw bales for skirting your RV or Tiny Home.
The physics behind why straw works so well is simple. Straw is hollow plant material packed into dense bales. The hollow structure traps massive amounts of air, and still air is one of the best insulators in existence. When you stack straw bales around your RV and tarp over them, you create a dead air space with extreme thermal resistance.
If using this skirting option, tarp around the exterior of the bales to prevent mold and moisture build up. The ground clearance should be considered to accomodate for the bales. Leave 6-inch gaps at two opposite corners for airflow. Straw is organic material. In an enclosed space, it can generate heat from decomposition. Ventilation prevents composting and propane buildup.
The straw bales, or hay bales, are mainly a one time use. If you move around frequently, plan on purchasing new bales everywhere you go. Many RV parks do not allow straw bales as this option attracts rodents.
4. Plywood Skirtings
Stationary RV owners also utilize plywood panels as a custom skirting option for their RVs. Plywood panels usually require a wood frame and more power tools for the installation.
Similar to styrofoam boards, these panels are cumbersome to transport if you move frequently. Moreover, the cost of plywood can quickly add up. Again, RV parks may frown upon this option.
5. Inflatable Options
Air filled bags are an innovative way to protect water pipes and endure winter months. These inflatable tubes can be blown up under the RV to seal out air around the unit.
The downfall on this skirting option is that the bags also deflate and may require refilled every day as the temperatures fluctuate from cold nights to sunny days. While sturdy, this option also doesn’t hold up to sharp objects that can puncture the surface. During harsh winters, if not properly aired up, these air bags can be carried off by the wind.
6. Premium Skirting Vinyl
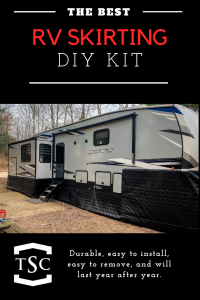
One of the best ways to skirt your RV is with heavy-duty vinyl skirting. The Skirting Co offers two types of RV skirting.
The Standard, non-insulated skirt features a premium vinyl material designed for long-term durability. Designed as a reliable wind barrier to protect your pipes, this heavier vinyl remains easy to remove and reattach for full-time travelers.
For maximum warmth, The Skirting Co. also offers an Insulated Skirting option with an R7 rating. Quilted together in 6 layers, it folds up effortlessly for travel days while delivering phenomenal thermal retention to lower your energy costs.
The Best DIY RV Skirting Guide With Professional Results
Here are some tips and tricks that will focus on The Skirting Company’s installation recommendations. One of the best resources is the Install Page. This page has numerous videos to help DIYers with that installation process.
The Tools You Actually Need to Get This Done
Half the people who show up to a DIY skirting project are either way over-equipped or missing the one tool that makes everything easier. With a system from The Skirting Co., the hardware and channel components are designed to work together, which reduces how much you need to source separately. That is one of the underrated advantages of going with a purpose-built system over full custom fabrication.
Here is the honest list of additional tools you’ll need for skirting installation. Nothing on here is exotic. If you have done any basic home improvement projects, you probably own most of this already.
Tape Measure
screw gun
phillips bit
paper towel
scissors
side cuts
straight edge
flat, solid surface
pencil/marker
Step-by-Step Installation That Gets It Right the First Time
Installation is where most guides get vague right when you need them to be specific.
The process is actually straightforward when broken into phases. Follow this sequence and you will not find yourself redoing sections halfway through.
Prep
Extend slides exactly as they will be during use. Do not skip this.
Clean the area where your top channel or attachment system will mount. Dirt and grime will prevent adhesive from bonding properly. Use the alcohol included in the DIY kit to clean the surface area where the track will be installed.
Organize your materials so they’re easily accessible.
Install the Top Track or Mounting System
Attach your top channel or mounting hardware along the floor line, or bottom rail, of your RV. This is what your skirting panels will lock into. Follow the example in the installation tutorial video.
To prevent a crooked track, you can use a level, or your straight edge, as you go.
Cut and Install Panels
Install one panel at a time. For any panels that are cut on the Insulated Skirting, you’ll want to use the Trimlock to seal the cut edges. Trimlock is not included, or necessary, with the non-insulated skirting option.
Slide panels into the track starting at one corner and working around the rig. Work in one direction consistently.
Seal the Bottom Edge
On uneven ground, use small sandbags, waterbags, or watertubes for pool covers fill gaps. Do not leave any open sections along the bottom, as cold air is remarkably good at finding small openings.
2. Do not use stakes as staking the skirting can eventually cause damage to the material.
Seal Panel Seams
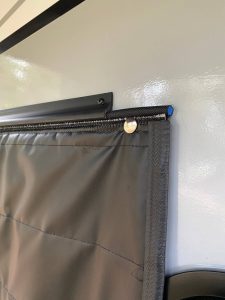
Insulated RV Skirting slides into a track and a snap aids in holding the corner in place.The DIY kit includes heavy-duty velcro. The velcro has an adhesive backing, but like the adhesive snaps, the adhesion can fail in bitter cold weather. Rivets and a rivet tool are also included in the DIY kit. Use the rivets to secure the velcro to the skirting panels.
Use snaps at corners to decrease gaps and at changes in track elevation.
The whole installation typically takes between 6-12 hours for a standard travel trailer or fifth wheel. Contact The Skirting Co for compatability for Class A motorhomes. Go slow on your first install and you will be significantly faster should you do it again on another unit.
The Most Common DIY Skirting Mistakes and How to Avoid Every One of Them
These mistakes show up repeatedly, and every single one of them is avoidable with a little advance knowledge.
Mistake 1: Installing Skirting Too Tight
The skirting should hang a bit loose on the RV. You do not want a tight and snug fit with the skirting. The skirting will expand and contract a bit depending on the weather conditions.
Mistake 2: Ignoring the Bottom Seal
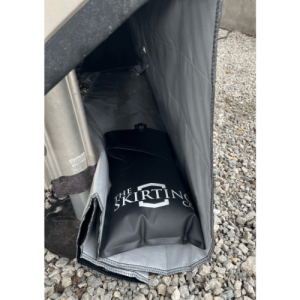
People spend hours getting panels perfect and then neglect anchoring the skirting at the ground. When air gets under the skirt, it forms a positive pressure that can blow out the snaps. If the unit is in a high wind area, consider additional waterbags, sandbags, sand tubes, etc. to help seal the skirting to the ground. Always fold the excess skirting material towards the belly of the RV (for more information, visit this post). Install the weighted objects on top of the excess material directly under the RV itself. Never put the weight on the exterior of the skirt. This will splay the velcro and create a gap where wind gets in. Cold air does not need much space. Seal the bottom edge every time.
Mistake 3: Gaps at Corners
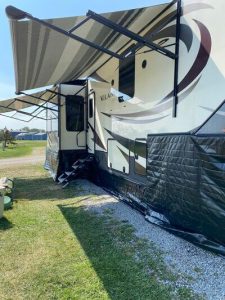
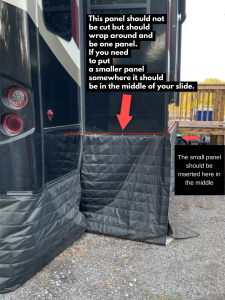
Corners can be a problematic area where gaps can form. You can make a slight cut into the keder at the top of the skirt to allow the skirting to form better at the corner. At certain corners, like those of the slideouts, pinch clamps can also be used to decrease any gap.
When installing panels around corners, make sure that the panel seams are not at corners. This makes it more difficult for the seams to hold. See image at the side.
Mistake 4: Slideouts and Track
Do not install track on the slideout walls that retract into the RV. The track protrudes about an inch. The track could potentially cause damage to seals around the slideout. Use the screw snaps on the slideout walls.
Mistake 5: Not Using Pull It Up Fasteners
Pull It Up Fasteners are helpful for fifth wheel panels and securing to the RV.
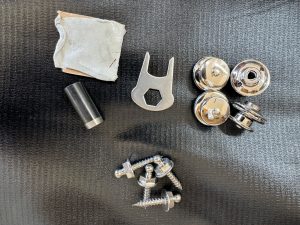
In the DIY kit specifically for 5th wheels, a small bundle of 4 unique snaps are included. These snaps differ from the typical screw snap. We call these Pull It Up Fasteners (PIU’s). PIU’s are utilized on the 5th wheel between each of the 3 track. The PIUs have a push release feature. This helps distribute the weight on the 25’x10′ 5th wheel panel and helps secure it to the upper portion of the RV.
Mistake 6: Neglecting the Rivets
Rivets are included in the kit for a reason. As we've discussed, the adhesive on the velcro backing can fail. Rivets offer a more permanent solution for this situation.
Every one of these mistakes adds time, money, or frustration to the project. Avoiding them takes almost no extra effort upfront. Do not skip the planning phase.
Cold Weather Skirting Tips That Most Guides Leave Out
There is a difference between skirting that is installed and skirting that actually performs in deep cold.
Getting your panels up is only part of the equation. These finishing details separate a setup that looks good from one that genuinely holds warmth when temperatures drop below freezing.
Monitor the temperature below the RV
Even well-skirted RVs can drop below freezing below the RV. It’s important to have a thermometer within the skirted area to check the temperature without having to open the skirting. This one is an affordable option, or the YoLink brand + Hub (available on Amazon).
Run a small radiant heater or heat mat inside the skirted cavity
On nights that drop well below freezing, a low-wattage heat source inside the underbelly cavity makes a massive difference in how well your floors and pipes hold up. We suggest the Yellow Jacket brand of heaters with their programmable thermostat and built in safety features.
Add foam where skirting may rub
Your skirting could potentially rub on the metal hitch area. Use a pool noodle between the hitch and skirting material to help prevent ware at this area, or any place where skirting rubs on harsh edges.
Inspect your skirting after the first hard freeze
Cold causes materials to contract. Panels that fit snugly in 50 degree weather may develop small gaps when temps hit the single digits. Do a walkaround after the first real cold snap and address anything that has shifted.
Weigh down at windy sites
Wind is the enemy of ground-level seals. Simple sandbags/sandtubes or waterbags/watertubes along the bottom edge prevent panels from lifting in gusty conditions. Evaluate the skirting during or after windy days to see if there are any problem areas that need addressed and additional weight installed on skirting.
Septic hose areas
Do not create a cut into the skirting at the septic areas. Drape the excess skirting over the septic pipe and tuck it around the hose, like tucking a blanket around a child. Apply sandbags/waterbags on the excess material on either side of the hose to help secure it in place.
RV lifted at axels?
Contact The Skirting Co before ordering if your RV is equipped with any sort of lift option.
Good skirting is a system, not just a barrier. When the panels work together with heat management and proper sealing, the result is a rig that holds warmth dramatically better than anything you experienced before installation.
When to Use a Purpose-Built Skirting System vs. Full DIY Fabrication
Not every situation calls for the same approach, and choosing correctly saves you time, money, and a significant amount of frustration.
A purpose-built system from The Skirting Co. is the right call when:
Frequent mobility matters: Skirting that installs and removes in under an hour is needed.
Looking for a polished finish: A professional look over a foam board patchwork is desired.
Camping in harsh winters: Reliable insulation performance is required without guessing at R-values.
Living full-time in your rig: Avoid rebuilding custom panels at every new campsite.
Preferring an all-in-one setup: You want integrated components rather than sourcing hardware from three separate stores.
The best skirting solution is the one you will actually use consistently. A purpose-built system you install every time is always better than a DIY panel set that stays in the storage bay because it is too much work to set up. Make your decision based on your real camping habits, not your ideal version of them.
DIY Skirting + Professional Results
Skirting your RV is one of those projects that feels intimidating right up until the moment you finish it, and then you immediately wonder why you waited so long. The warmth difference is noticeable from the very first night, and the peace of mind that comes with knowing your pipes and underbelly are protected is worth every hour you put into the installation. As an added bonus, insulated skirting is optimal for year round use. Read here for more details.
Visit The Skirting Store to explore options built specifically for RV use, sized and engineered so that the hard part of this project is already done for you.
Hayley Hand
Hayley and her husband, Chase, lived full-time in their RV while Chase served in the military. They have traveled all over the United States with their 4 kids. Currently, the family is ranching in Montana and they enjoy exploring the great outdoors.
Did you enjoy this blog? Please share this article:



 Corners can be a problematic area where gaps can form. You can make a slight cut into the keder at the top of the skirt to allow the skirting to form better at the corner. At certain corners, like those of the slideouts, pinch clamps can also be used to decrease any gap.